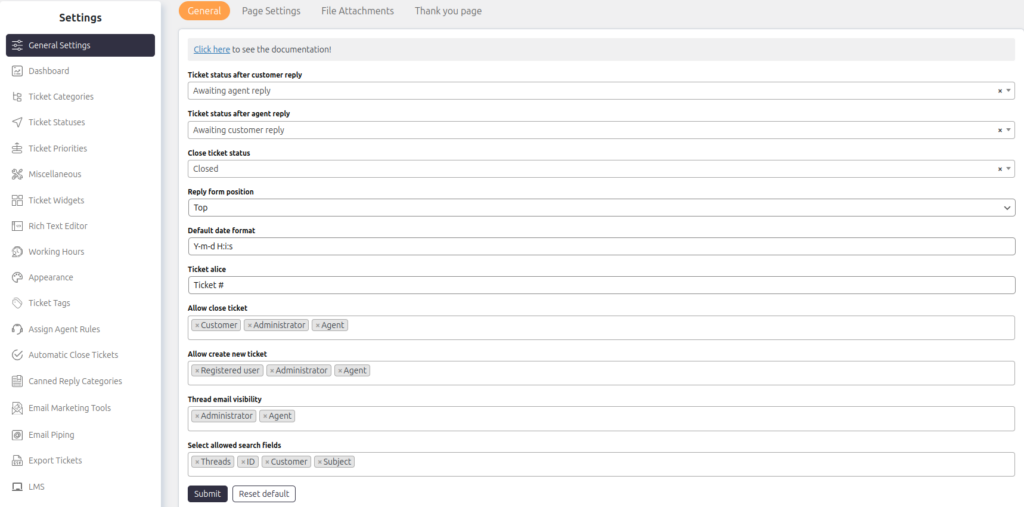
Support → Settings → General Settings → General
The General Settings section allows you to configure important ticket settings, such as status updates, permissions, and visibility. Below is a description of each option:
1. Ticket Status After Customer Reply
This option lets you set the ticket status when a customer (ticket creator) replies to the ticket. If you don’t want the status to change, select “Do not change.”
2. Ticket Status After Agent Reply
This option lets you set the ticket status when an agent replies to the ticket. To prevent automatic status changes, select “Do not change.”
3. Close Ticket Status
Here you can choose the status that appears when a ticket is closed by either the agent or the customer.
4. Reply Form Position
You can decide where the reply form appears on the ticket page:
- Top: The reply form appears at the top, and ticket threads show the latest replies first.
- Bottom: The reply form appears at the bottom, and ticket threads show the oldest replies first.
5. Default Date Format
Set the format for displaying dates in the system. This format will apply to Date or DateTime custom fields unless another format is specified.
For example, you can set it as Y-m-d H:i:s
6. Ticket Prefix
You can customize the label for tickets. For example, if you rename “Ticket” to “Case,” all tickets will appear as “Case #1234.” This will reflect across tickets, email notifications, and more.
7. Allow Close Ticket
Choose who can close a ticket:
- Customers
- Administrators
- Agents
To close tickets, the selected user role must have access to the ticket and permission to change its status.
8. Allow Create New Ticket
Select who can create new tickets:
- Registered Users: Users with WordPress accounts can create tickets.
- Guests: Website visitors without accounts can create tickets.
- Agents: Support agents with assigned roles can create tickets.
9. Thread Email Visibility
Control which agent roles can view the email addresses of users in the ticket threads. Customers will never see these email addresses.
10. Select Allowed Search Fields
Define the fields where keywords can be searched. You can include both default fields and custom fields, such as:
- Threads
- ID
- Customer
- Subject
Once configured, click Submit to save your changes or Reset Default to restore the original settings.

