
Overview
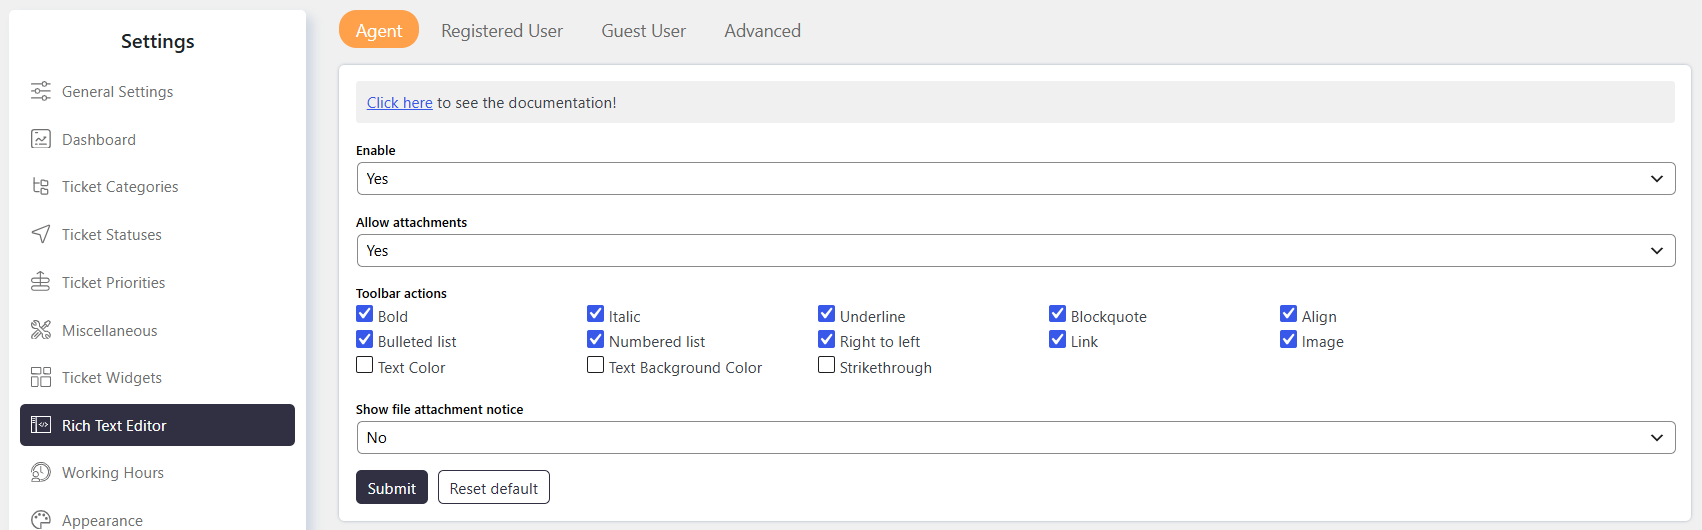
The Rich Text Editor settings allow you to configure the text editor separately for Agent, Registered User, and Guest User.
You can control whether the editor is enabled, whether attachments are allowed, which toolbar actions are available, whether attachment guidelines are displayed, and whether HTML formatting is retained when content is pasted.
Where to Find
Go to Support → Settings → Rich Text Editor.
How It Works
Rich Text Editor settings are configured independently for each user type.
The available user types are:
- Agent – Internal users managing tickets.
- Registered User – Customers or users with accounts.
- Guest User – Users without accounts accessing the support system.
You can select a user type and configure the editor features according to your requirements.
Step-by-Step Guide
- Go to Support → Settings → Rich Text Editor.
- Select the required user type tab: Agent, Registered User, or Guest User.
- Configure Enable.
- Configure Allow Attachments.
- Select the required Toolbar Actions.
- Configure Show File Attachment Notice.
- Configure HTML Pasting.
- Click Submit to save the changes.
- Click Reset Default if you want to restore the default settings.
Options / Settings
Enable
Controls whether the Rich Text Editor is enabled for the selected user type.
Available options:
- Yes – Enables the Rich Text Editor.
- No – Disables the Rich Text Editor. A textarea is shown instead of the TinyMCE editor.
Allow Attachments
Controls whether users can add attachments through the Rich Text Editor in fields such as ticket descriptions, replies, and notes.
Available options:
- Yes – Allows attachments.
- No – Prevents attachments.
Toolbar Actions
Controls which actions are available in the Rich Text Editor toolbar.
Available actions include:
- Bold
- Italic
- Underline
- Blockquote
- Align
- Bulleted List
- Numbered List
- Strikethrough
- Right to Left – Controls text direction.
- Link
- Image
- Text Color
- Text Background Color
Use the checkboxes next to each action to enable or disable individual toolbar actions.
Show File Attachment Notice
Controls whether file attachment guidelines are displayed to users.
Available options:
- Yes – Displays attachment guidelines.
- No – Does not display attachment guidelines.
When enabled, the notice can provide information such as:
- Allowed file types
- Maximum file size
HTML Pasting
Controls whether HTML formatting is retained when content is pasted into the Rich Text Editor.
When enabled, copied content containing HTML formatting, such as bold, underline, and lists, retains its formatting when pasted into the editor.

Example
If you want Registered User to use a Rich Text Editor with formatting and attachments:
- Go to Support → Settings → Rich Text Editor.
- Select the Registered User tab.
- Set Enable to Yes.
- Set Allow Attachments to Yes.
- Enable the required Toolbar Actions, such as Bold, Italic, Bulleted List, and Link.
- Set Show File Attachment Notice to Yes if users should see attachment guidelines.
- Enable HTML Pasting if pasted HTML content should retain its formatting.
- Click Submit.
Notes / Tips
- Rich Text Editor settings can be configured separately for Agent, Registered User, and Guest User.
- Disable Enable when a user type should not have access to the Rich Text Editor.
- Use Toolbar Actions to control which formatting features are available.
- Allow Attachments controls attachments in fields such as ticket descriptions, replies, and notes.
- Enable Show File Attachment Notice when users should see file type and file size guidelines.
- Use HTML Pasting when pasted HTML content should retain its formatting.
- Use Reset Default to restore the default Rich Text Editor settings.